How to Download Instagram Stories on Android

Instagram story is one of the attractive features that users can use to publish posts that are quickly visible to users and used for temporary notifications or for awareness.
The story feature was added to the popular social media Instagram in August 2016 and has seen several updates to it. For example, some users are able to publish more than 15 seconds of video in this section or different stickers are designed to be added to the story.
But what if you see a story that you want to save on your device? Instagram itself does not allow users to download videos and photos published in this section, but the good news is that you can do this in different ways.
Download Instagram stories for Android
Instagram stories are not available for download. But third-party apps have been developed to download Instagram videos, stories, and photos that can help us do this. To use these Instagram downloader programs, just copy the link of the post or story you want to save and then paste it in the said app. In the following, we have listed some of the best applications that have been developed to download Instagram stories.
Fast Save
FastSave is the most used service for downloading Instagram content. This option is considered one of the best story saving apps for Android.
It is possible to create a hidden folder in FastSave.
It has more than 10 million downloads and very positive feedback from users.
The user interface of the application is similar to Instagram.
FastSave has a dashboard to manage all downloaded files.
Story Saver
Story Saver is an app that allows you to save Instagram videos and photos to your device.
You do not need to log in to your account to use the application immediately.
To start downloading, paste the desired link in the application and then the original file will be downloaded.
It is also possible to download the user's profile picture.
It has a friendly user interface and is easy to use.
Story Saver for Instagram
Story Saver is an app to save Instagram content. It can be considered as one of the best Instagram story saving apps for Android.
You can use this application to download photos, videos and stories to your smartphone.
If necessary, you can change the download path.
All photos in one post will be downloaded.
You can read and copy posts, tags, photos, captions and videos with this tool.
The app allows you to share content directly or republish it on your page.
You can use messenger and email to transfer photos and videos.
It is possible to search pages and tags.
Instore
Instore is another app that allows you to download any Instagram content.
With the help of the mentioned application, texts, videos, images, live broadcasts and interesting stories are saved in your smartphone so that you can access them whenever you want.
In addition to photos and videos, this program also saves Instagram tags.
You don't need to log in using a third-party app. Instead, you can use the official service of developers.
Regrann
Regrann also allows you to download Instagram videos and photos with its cool interface.
You can add captions to photos.
You can download any post on Instagram using the mentioned program.
Cover posts are also downloaded along with clips.
You can see the downloaded files in the gallery.
You can use this app to repost other people's posts with original quality.
Quick save and repost options are available in the app.
iSave
iSave application is designed to transfer photos and videos from Instagram to your smartphone.
You can use it to download photos and videos to your mobile device.
This application comes with a video tutorial on how to extract content from the social network.
The mentioned app allows you to download the posted content with original quality.
iSave has an integrated gallery that displays downloaded content in a clear and consistent place.
All files are stored in the internal memory of the phone and can be accessed through a separate tab.
4k download
4kdownload can download videos from most platforms. You can use it to save videos published on Instagram, YouTube and even TikTok.
You can download videos from Instagram, TikTok, YouTube and other platforms.
This simple app is great not only for saving Instagram stories, but also for categorizing them.
The main features of the application are free. However, if you want to use additional services, you need to pay a membership fee.
AhaSave
AhaSave is a great Instagram story saving app for Android smartphones that allows you to download and save any Instagram content.
You can use it to download all the content published on Instagram.
If you like the post caption, put its link in the application so that you can access the desired text.
You can also upload high quality photos and videos directly to Instagram.
How to Add Location on Instagram Bio
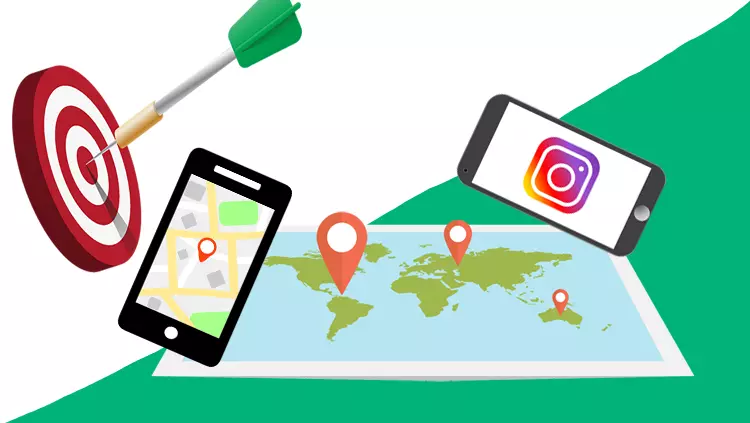
Even if your products or services are great and efficient, many of your audience and customers will not spend time to search on Google and find the address of your business, so you need to save users time by adding location. Add it to your Instagram bio as one of the factors.
Adding location in Instagram bio is very simple and when users click on it, they will be directed to their map application, so they can easily find the address of your store or company. In this way, users can easily receive your goods or services in person.
If your business is such that it is better to add your location to Instagram bio, you must first change your account to business type because this option is not activated for regular accounts.
Steps to add location in Instagram bio
First, make sure you have a business account.
To do this, select setting and then account.
If you have a business account, you will see the Switch back to a personal account option, but if you do not have a business account, you must click on the Switch to a professional account option.
In the next step, choose your category and finish the job.
In addition to being able to add your location to your Instagram bio, you will also have access to a set of useful tools for Instagram optimization. including call to action buttons, analysis and...
Edit your profile.
At this stage, click on the edit profile option on your page.
Then select contact options in the public business information section.
In this section, enter the phone number of your company or store in the business phone number field, and enter the address of your business in the business address field. This option will take you to a page where you can enter your street address, city or zip code.
Save your desired location on the map
After checking for any spelling mistakes and making sure that you entered everything correctly, click done to be returned to the public business information section. At this stage, select the save option so that your location will be published in your profile.
Why Instagram Consumes So Much Data Tips to Reduce Data Usage
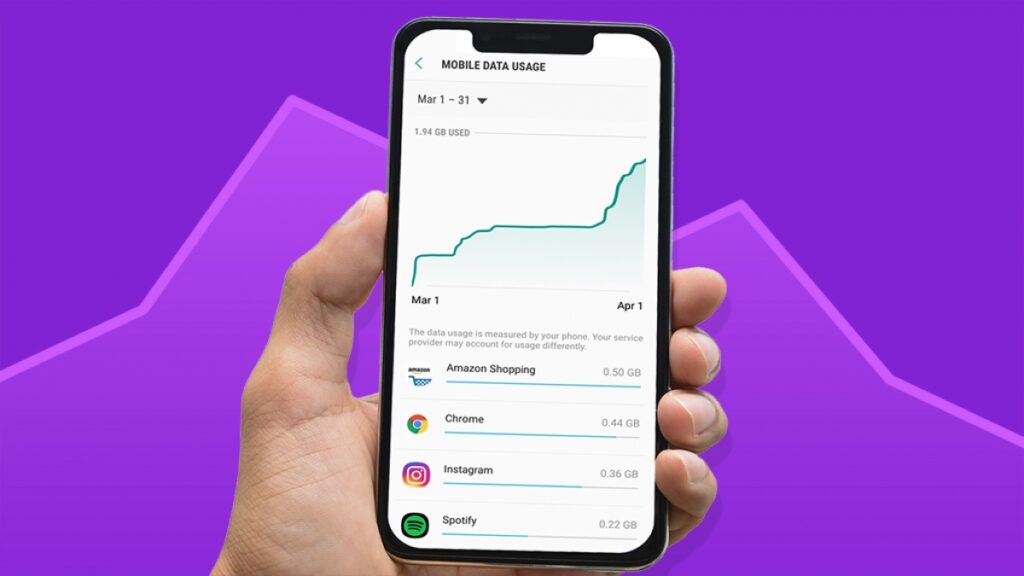
View the amount of internet usage on Instagram
Many may think that this statistic is wrong and want to see it for themselves. As we said, this statistic is an average and the consumption of one hour of being on Instagram may be a little less or more than this amount.
It is only necessary to view your Instagram internet usage
Enter the section (Wireless & Networks) through the (Statings) section.
In the (Data Usage) section, you can see the amount of internet usage of each program.
Of course, you should know that in this section, you only see the consumption of mobile internet by the programs.
After you have seen the Internet usage of Instagram in this section, refer to the section (Show Wi-Fi usage) to see the usage of this application from the Internet Wi-Fi. The sum of these two numbers shows your Instagram consumption.
If you are one of those people who spend a few hours on Instagram every day, you will definitely not come across a small number. After seeing this amount of internet usage, you will most likely be looking for ways to reduce internet usage on Instagram.
Teaching how to reduce internet usage on Instagram
As we said, Instagram's internet usage is high and we should look for ways to reduce internet usage on Instagram. Using some simple but practical methods will reduce your internet usage appropriately. Note that according to some points, each of these methods reduce internet usage in different ways.
So maybe it is not necessary for you to use all of them and it is better to choose and use the best ones according to your needs. In the following, we will introduce several methods through which you can reduce the internet consumption of the Instagram application to a suitable amount. These methods include:
1- Reducing internet usage on Instagram from the (Cellular Data Use) section
One of the ways to reduce internet usage on Instagram is to use the (Cellular Data Use) or (Mobile Data Use) section. For this you must
Log in to your Instagram account.
Then, enter the section (Account) through the menu (Settings).
In this section, look for the option (Cellular Data Use) or (Mobile Data Use).
After entering this section, you can use one of the ways to reduce internet usage on Instagram by activating the (Data Saver) option.
Enabling this option will prevent different videos from downloading automatically.
2- Reducing internet usage on Instagram from the (High Resolution Media) section
Another thing you can do in the same section (Cellular Data Use) or (Mobile Data Use) to reduce internet usage on Instagram is to turn off the (High Resolution Media) option. This will give you three choices when you select this option. These options include the following.
View photos and videos with the highest quality at any time (when using the internet and Wi-Fi)
View photos and videos with the highest quality only when using Wi-Fi internet
Not seeing photos and videos with the highest quality
These are the options you can choose from. By selecting the option (Never), the quality of photos and videos will decrease slightly. But the important thing is that after doing this, you will experience the reduction of internet usage on Instagram to a decent extent.
Using some simple but practical methods will reduce your internet usage on Instagram.
3- Internet settings for Instagram
You should know that some applications also consume internet in the background. The concept of background internet usage is that when you are connected to the internet, even though you have not opened the app, the app in question consumes some internet. Of course, you should know that some messengers and social networks may not be able to give you messages correctly if you stop the background internet usage in them.
They will only show your messages when you open them. But this can reduce internet usage on Instagram and some other applications.
For this, you need to go to the Settings section of your phone.
After that, select the option (Data Using).
In this section, you can see the list of all your applications.
Look for Instagram among them. After entering the Instagram section, activate the (Restrict background data) option.
By doing this, you can reduce the amount of internet consumed by Instagram.
4- Turning off (Notifications)
Another way to reduce internet usage on Instagram is to turn off the notification of this application. To do this:
You need to enter the mobile phone settings.
Then enter the (Notifications) section and select the (Advanced) option.
In this section, find Instagram and turn off the option (Allow notifications).
After doing this, you will no longer receive Instagram notifications, but your internet usage will be reduced.
When you are connected to the internet, even if you don't open the app, it still consumes some internet.
5- Disabling Instagram update in Google Play
Android phones download and install different applications through Google Play. One of the features of this application is that when a new update is released for different programs, it automatically downloads them. This can increase your internet usage. For this reason, you can turn off the automatic update option to reduce internet usage on Instagram and your mobile phone in general. To do this, you must do the following.
First, enter the Google Play Store.
Then select the option (Settings) through the menu button.
In the new section that is entered, touch the (Settings) section.
There are three options in the menu that you will see.
The first option: The first option you see is (Over any network). Selecting this option means that whenever new updates are available for apps, they will be automatically downloaded and installed.
The second option: The second option is (Over WiFi only). By selecting this option, apps will update only when you have access to Wi-Fi.
Third option: The third option in this section is (Dont auto-update apps). By selecting this option, apps will only be updated when you manually select them. By choosing the third option, other programs will not be downloaded and installed automatically and your internet usage will be greatly reduced.
6- Not saving uploaded photos and videos
One of the things that consumes the Internet on Instagram is storing photos and videos that you upload to Instagram. In addition to using up the internet, this will eventually fill your phone space. So we suggest that you disable this feature of Instagram using the settings.
for this job :
Go to your Instagram account settings.
Then enter the account section and select (Original Posts) option there.
In the section you enter, there is an option to turn off the ability to save photos and videos, which you can disable.
7- Using the Lite version of Instagram
Another way to reduce internet usage on Instagram is to use its light or light version. This version, published by Instagram itself, lacks some features of the original version, but it can have a great effect on reducing your internet usage. This app has many of the main features of Instagram, such as Direct, viewing photos and videos, and stories.
Features such as live and filters on Instagram are among the things that have been removed in this version of the application. So if you don't use these things a lot, you can use the light or light version of Instagram to reduce internet usage.
One of the ways to reduce internet usage on Instagram is to use its light version.
The lite version of Instagram does not have some features of the original version, but it can have a great effect on reducing your internet usage.
Why Does Instagram Change the Color of Photos
Have you ever been frustrated that Instagram changes the color of your photos after uploading them? It can be disheartening to spend time editing and perfecting a picture only to have it appear differently on Instagram.
. But why does this happen?
In this article, we will explore the reasons behind Instagram’s color of photos changes and provide practical solutions to prevent this issue in the future.
One of the main reasons why Instagram changes your photos’ color is its built-in image compression algorithm. As one of the largest social media platforms, Instagram handles an enormous amount of data daily. With millions of posts uploaded each day, it becomes necessary for Instagram to compress and encode images to reduce their file size and optimize storage efficiency.
This compression algorithm is designed to ensure that images take up less space on Instagram’s data centers. However, as a result, the quality and color patterns of the images may be compromised. The algorithm works by customizing the data and pixels in your photos, which can lead to changes in color. Another factor that can change the color of photos on Instagram is using different color profiles. By default, Instagram uses the sRGB color profile. If you upload an image that was created using a different color profile, the platform may struggle to accurately display the colors.
Instagram has specific requirements for image resolution and file format. The native resolution is 1080×1080 pixels, and the recommended format is JPEG. If you upload an image with a different resolution or format, Instagram will have to convert it using its compression algorithm, which can result in changes to the color and quality of your photo.
- Use Your Phone’s Native Camera
Instead of using Instagram’s camera feature, consider using your phone’s native camera app to capture your photos. Instagram’s camera applies filters and compresses the images during uploading, which can result in color changes. Using your phone’s native camera, you can retain the original colors of your photos.
- Utilize Lightroom for Image Compression
To prevent Instagram from changing the color of your uploaded photos, you can use the Lightroom app to compress the image before uploading it. Lightroom allows you to set the custom color space to sRGB, which aligns with Instagram’s requirements. By compressing the image using Lightroom, you can maintain the quality of the colors in photos.
To compress an image using Lightroom, follow these steps:
- Launch the Lightroom app on your Android or iOS device and log in to your Instagram account.
- Tap the “Import” icon and select the photo you want to upload.
- Edit the photo as desired, ensuring the color space is set to sRGB.
- Export the photo as a JPEG file with a resolution of 1080 pixels on the long side.
- Save the file on your device and upload it to Instagram to check if the color remains unchanged.
When uploading photos to Instagram, having a stable internet connection is crucial. An unstable connection can restrict encoding and decoding patterns, resulting in compressed files and altered colors. Ensure you have a stable Wi-Fi connection, or consider using a 4G network to upload your photos.
- Consider Monotone or Black and White
As mentioned, Instagram tends to remove excess color from photos to make them appear more balanced on lower-end smartphones or to align with its color profile. You can experiment with monotone or black-and-white images to prevent your photos from appearing drastically different. These styles require less processing power and are less likely to be affected by Instagram’s compression algorithm.
Why does my Reel say 0 views but has likes
One of Instagram’s coolest features is Reels – those short, bite-sized videos that can capture our attention and make us feel like social media stars.
But wait, here’s the mind-boggling part: have you ever asked yourself? Why does my reel say 0 views but has likes?
Sometimes, social media algorithms can be quirky. The algorithm still needs to catch up with your reel and has yet to show it to many people, resulting in low views.
However, a few lucky souls who stumbled upon your reel might have liked it before the views started rolling in.
So, grab a coffee, relax, and wait longer to see if the view count starts climbing. You can also share your reel with friends, family, and followers on other platforms.
Blast it on Twitter, slide it into your Instagram stories, or even go old school and send it through good ol’ text messages.
Tell them to check it out, give it some love, and encourage them to share it with their buddies. The more people see it, the better your chance of racking up those views.
Another possibility that may cause you to ask yourself why my reel says 0 views but has likes is ghost viewers!
It’s no secret that social media platforms sometimes struggle to track views accurately.
So, people may have watched your reel, but the system failed to count those views for some reason.
However, those few viewers who managed to defy the system and hit the like button are the reason your reel has likes.
Sometimes, technology can be as unpredictable as the weather. So, go on a detective mission and ensure there aren’t any sneaky glitches messing with your view count.
Double-check your privacy settings, clear your cache, or try viewing your reel from a different device.
If you suspect something fishy, don’t hesitate to contact the platform’s support team for help.
Show appreciation, answer questions, and get the conversation going with those awesome folks who’ve liked your reel.
Some people may have viewed your reel by chance or through a shared link but have yet to watch it directly on your reel’s page.
Consequently, the official view count remains at zero, but the thumbs-up lovers who caught a glimpse couldn’t resist showing their appreciation.
Direct is the way to go, my friend! Encourage people to watch your reel directly on the reel’s page. When they watch it there, every view counts and gets registered properly.
So, when sharing the reel, include a clear call-to-action, like “Watch it on my reel page for the full experience!”
Share snippets or teasers of your reel on other platforms where you have a presence.
For example, create a short video preview for TikTok, a captivating image for Pinterest, or a funny GIF for Twitter. Add a link in the captions or bio that directs people to the main reel page.
Follower fallout is another justifying reason for the reel saying 0 views but has liked on Instagram!
Boost that visibility, amigo! If your reel is only visible to your followers, it’s time to broaden your horizons. Consider making it public or find ways to reach a wider audience.
Use those sweet hashtags relevant to your reel’s content, engage with like-minded creators by leaving thoughtful comments on their posts, and join relevant communities where your reel’s topic is discussed.
The more you put yourself out there, the higher the chances of attracting new viewers.
However, if a few of your loyal fans found your reel through other means (like notifications or direct shares), they might have liked it before your follower count caught up.
Shout it from the rooftops, my friend! Your followers are your biggest cheerleaders, so don’t hesitate to ask for their support. Share your reel with them through stories, posts, or messages.
Social media is full of lurkers—people who silently enjoy your content without leaving any trace.
Your reel may have reached some mysterious watchers in this case, but they prefer to stay hidden in the shadows.
Nevertheless, a few of them might have broken their silence and dropped a like on your reel, giving it some love.
Spark some engagement, ask questions, or start discussions in your reel’s caption or comments, get those lurkers out of the shadows, and encourage them to leave comments and likes.
For example, if your reel is about a new recipe, ask viewers about their favorite ingredients or cooking tips.
Engaging with your audience creates a sense of community and can lead to more likes and shares.
Highlight the positive feedback and encourage your followers on other platforms to check it out. This social proof can motivate others to engage with your reel and leave their likes.
Sometimes, our biggest supporters are our friends and family, which means you can never deny the possibility of their effect on a reel saying 0 views but has likes!
Even if your reel hasn’t gained much traction yet, your loved ones may have watched it and liked it immediately to show their support.
They’re like the superhero squad for your reel, boosting the like count while the views catch up.
Rally the troops, buddy! Contact your friends and family and ask them to watch and share your reel. Let them know how important it is to boost the view count and ask for their help.
Share a personal message explaining why this reel means a lot to you, and express gratitude for their support. Sometimes, a heartfelt request can go a long way in generating views and likes.